
The Ultimate Beginner’s Guide to Photography: learn how to take good photos
Photography Guide for Beginners
Photography entails shooting, editing and promoting images. A photographer can capture even the light’s wavelength than is not visible with the human eye as long as they have the right camera equipment.
The art of taking pictures has changed the world, especially now that everyone can take family portraits and selfies with their mobile phones.
It has become the second nature for its ingrained in our present culture and has caused the world to forget that it's a relatively new concept.
Estimated reading time: 14 min
Table of Contents

Brief History of Photography
Photography has a rich history that is not more than 200 years old. However, the art of making images characterized by bitter competition, intense internal rivalries and the use of lethal devices. For instance, it's a field that used in other disciplines like military tracking, color animation and explosive technology.
The first photograph was taken in 1826 by Nicephore Niepce, which was produced on a polished pewter plate and covered with bitumen of Judea.
The photo was produced using a camera, but it required exposure to bright sunshine for eight-hour exposure. This process failed, and the French inventor began experimenting with other compounds such as a mixture of chalk and silver, which darkened when exposed to light.
Louis Daguerre took over after his partner Niepce died of a stroke in 1833. Daguerre in 1839 invented Daguerreotype of a process of applying on a copper plate and to date a similar process is used for Polaroids.
William Fox Talbot refined Daguerre invention and invented the calotype process in 1840. Talbot gave up on photography, and George Eastman took over his process and improved it. Kodak Brownie was introduced in the market, and in 1901, photography was made available to the public.
The period 1935-1975 was referred to as the golden age of photojournalism due to its prominent photo-story pages while television made it possible to see live things on the screen. Many newspapers and magazines were producing images in black and white.
In the mid-1980s journalist began using photography alongside headlines, drawings, graphics; it was considered as another design tool. In 1994 the first digital camera was invented and introduced in the market. Today you can take individual photographs courtesy of digital cameras built into computers, smartphones and other devices.
Therefore, it's almost 200 years since Joseph Nicephore Niepce took his first photo in 1826, but the world of photography has witnessed tremendous changes throughout the years.
Parts of a Camera
Cameras produce photos by capturing the characteristics of light on the subject. The following parts that are involved in this process.
The Camera Body: It’s the box that houses the other camera parts like lenses and sensor.
The shutter: It opens when the button is released and allows light to penetrate through the lens aperture up to the image sensor.
The Lens: They are either a fixed lens that is permanently attached to the camera or interchangeable lens that is removable. The amount of light that goes through it is dependent on the size of the lens.
The Aperture: It works like the pupil of the eye and therefore, it controls the amount of light reaching the sensor.
The Image Sensor: It reads the light that has been allowed in the aperture and stores it in the memory card of the camera.
The Camera Liquid Crystal Display (LCD) Screen: It allows the photographer to view the scene or the subject before capturing the photo.

How to Take Good Photos
Many inexperienced persons consider the photograph as a simple skill that involves pointing the camera and shooting a photo. However, those who undertaken photography lessons will tell you that there is taking a great photo involves a lot more than that.
Learning how to take professional photos will lead to greater opportunities. Producing presentable photos improves your online photography portfolio and the higher the chances of landing photography jobs.
The following are tips for taking the outstanding photos.
Understand the Basics of Composition
What is your main point of interest? Is it a tree, a person or a building? That is the focal point in photography, and therefore, you should have a strong focal point for that is one of the basic steps in taking great photos.
Therefore, whenever you're taking photos to step back and ask yourself what it is that you want your viewers to focus on. Make it as strong as possible once you understand it, and there are composition rules that will make it as interesting as possible, thus draw and hold the attention of your viewers.
1. Change the Perspective
Change the distance and angle of the shoot to change the meaning and mood of the images. You can achieve this by shooting from above to make the individual small or below to make the person taller.
On the other hand, shooting from a distance makes the person appear insignificant while getting closer makes them fill the frame and create a sense of power.
2.Leading Lines
These are basically line shapes that direct your viewer's eyes to the focal point. However, these are not literal lines but items such as fences, roads, trees, buildings or shadows that create a line in the photo.
An experienced photographer uses these lines to drives the viewer's attention to the destination of choice. Additionally, these lines can change the mood of the entire composition.
For instance, horizontal lines are linked to tranquility while vertical lines are associated with powerful mood.
3.The Rule of Thirds
The rule deviates from the common understanding that you should place the focal point in the middle of the photo. Instead, the rule urges that the important elements is what should be placed at the center.
For instance, when you have two lines dividing your image into three portions vertically and horizontally, you should have the important elements and subject at any of the four points where they meet or along the lines.
This concept helps you to find a better balance between the background and the main object rather than having a portrait that is crowded.
4.Convey Depth
You should find a way of creating depth in your shot to avoid the feeling of flat and boring. You can achieve this by having objects in the fore, middle and background.
Thus why not bring a person standing on a wall closer to create a better background with a bit of depth instead of just shooting a person leaning against a wall.
5.Add Bokeh Effect
The technique is applicable when you want to create depth in your shots. Most of the professional photos have this concept for photographer use blur effect intentionally to keep the background blurry and soft while the object is clear.
You can achieve this by bringing the object closer to the camera while the background appears far away. Additionally, you can use your zoom lens to achieve these effects.
6.Patterns and Symmetry
The use of patterns and symmetry in photography creates attention for humans who tend to identify patterns. Further, you can include colors and shades or other elements that disrupt the pattern.
7.Fill the Frame
The concept takes away space from the distracting elements and gives the subject more space around it. For instance, you can fill the frame with a person’s face when taking a portrait or shoot from the waist up.
8.Framing
This involves looking for an object that is used as a natural frame with your target inside it. Some of the items that can be used as the frame are foliage, archway, and a hole in a wall or doorway.
The aim of this concept is first to draw attention to the focal point and second to use the frame as the foreground layer, thus increasing depth.
Additionally, you can try other tricks like incorporating Bokeh effect in the background, or zooming on the subject, thus blocking the frame. A word of caution here is to avoid taking attention away from the subject.
Therefore, take time before taking a shot to find an interesting angle and change the entire mood of the photo. This is one way of perfecting your pictures.
Lighting
Another critical element in taking professional photos is lighting. However, this is one of the basic components that many inexperienced photographers overlook.
You need to make sure that your subjects are visible or the venue is well lit; otherwise, your camera won't capture all the necessary details.
Therefore poor lighting will contribute to grainy or blurry photos while too much light creates unwanted shadows. You should spend a significant amount of time picking suitable locations or angles to shoot from to avoid blurred or shadows on the photos.
You may also use lighting equipment instead of relying only on the natural light, which can be limiting. The following aspects will help you to take professional photos.
1.Light Reflector
The 5 in 1 light reflect will help you to manipulate light when shooting photos. The equipment has reversible covers with different reflective materials such as silver covers for bright light, black cover for removing light while white cover for softer light. Therefore, a light reflector is a simple way of manipulating light.
2.Camera Diffusers and Flashes
Camera flashes are another means of lighting your shots. However, their light might be too harsh, thus for your shots. You can invest in external flashes that can be used off-camera or attached to its hot-shoe.
Therefore, the external flashes offer you more flexibility and help you to aim the light instead of having it blasted on the subject directly.
Therefore, it should be your goal to spread the light out much evenly, thus making it appear less intense or bounce it off to the wall or ceiling.
Additionally, you can soften the light using different flash diffusers instead of bouncing it off the surface.
Other less expensive options are the diffuser for the inbuilt camera flashes, or you create DIY solutions like the use of different translucent white plastic containers that are cut to fit well over the flash.
3.Create Interesting Effects Instead
You can choose to leave the light there but instead, use it in interesting ways to alter the mood of your shots. The following are some techniques that can be used to make your photographs look professional.
- Capture the scene during the golden hour or the period before sunset or after sunrise. It's the time when the sun is low in the sky; thus, you can create a dramatic effect with the long shadows.
- Create a contrast by shooting when there is bright light and shadows. You can achieve this by shooting when the fence creates an interesting shadow, thus enabling you to capture some shades and patterns formed on your subject.
- Shoot photos during a sunset with a bright light and adjust your camera settings manually to create a dark silhouette with a lit background.
Camera Settings
Don’t always rely on your automatic camera settings because they limit your creativity, and they will not help you when you face a unique situation.
For instance, shooting a silhouette without adjusting your camera will give you a dimly lit subject and a background that is blown out.
You will get a blurry mess with an extra-long exposure when you shoot at night. Therefore, knowing your camera's settings will help you to make great pictures.
Editing
Photography is not all about taking photos; it also involves editing them to give them a professional look. Therefore you should give your shots some touch-ups such as brightness adjustments, cropping or color corrections among others.
You can use Photoshop, GIMP or other photo editing software to make your photos appealing. However, you should always remember the rule of editing not to go overboard when editing. A light touch is enough.
Invest in a Tripod
A tripod is as vital as your lighting equipment. You may, however, argue that you prefer handheld shots for you have steady hands.
A tripod is crucial for it helps you to experiment with different shooting techniques that you can't try without it. Some of the tactics you can't do without a tripod is long exposures, tethered photography, or when creating 3D images.
Further, it helps you to keep the camera ready as you work on other aspects of the venue. Therefore, endeavor to upgrade your camera and its accessories regularly to help produce outstanding photos.

Choosing Cameras for Beginners
The photographic gear market has a lot to offer you as well as support in this journey. However, there are specific considerations that you need to make as you navigate through this photographic equipment minefield.
The following features should influence your decision.
1.The Price
Cameras cost a lot of money and the bigger your budget, the more the options. Therefore create a reasonable budget of about $800-$1000, and your choices will be manageable.
Further, when acquiring a camera as a beginner, you should realize that your goal is not to find the best equipment in the market but the best for your budget and style.
You can find Digital single-lens reflex (DSLR) cameras in the market cost as much as a small car and with a lot of features. On the other hand, several cameras cost a few hundred dollars but can do an excellent job and packed with many features suitable for beginners.
Most of the entry-level camera is available at $300; however the prices increase with features like more megapixels and faster spend.
Although the older model is also good, the latest version has superior image quality as a result of improved technology.
2.Brand
There are different camera brand in the market such as Canon, Nikon, Sony or Pentax. You need to consider the brand when buying a DSLR than when looking for a compact camera due to their accessories and lenses. It pretty expensive to switch between brands, but that doesn't mean one brand is superior to the other.
Although a brand is an important feature to consider the features of a camera determines what kind of photos will be able to shot.
For instance, you need a telephoto lens when you want to capture wildlife pictures. In that case, Canon and Nikon brand are well-established and popular; thus, plenty of flashes, lenses and other accessories. On the other hand, Pentax has weather sealing feature which you can't find in another brand at that price.
3.Types of Cameras
There are different types of cameras in the market. They include;
Point and Shoot Cameras: These are smaller, lower-end cameras that have no removable lenses and ideal for quick snapshots.
DSLR cameras: These are standard cameras used by both professional and amateur photographers. They have interchangeable lenses and optical viewfinders.
Film Cameras: These cameras are perceived as archaic when compared to their digital counterparts; however, some photographers still prefers them due to their manual control and ability to create extremely specific images.
Bridge Cameras: They have similar characteristics with point and shoot cameras; however, bridge cameras have a super zoom lens.
Mirrorless Cameras: They are similar to DSLR cameras but lack internal mirror but have interchangeable lenses and digital viewfinders
4.Sensor
In a digital camera, light enters through the lens and hits the sensor which records the image. There are different sizes and designs of sensors. Take, for example, your smartphone camera which has a tiny sensor and compared it with a DSLR camera that has a larger sensor.
The large sensor is superior in a number of ways.
-
They have a higher resolution since the large sensor is equivalent to a bigger photo and higher image quality.
-
Larger sensors can work with low lighting in a better way than smaller sensors. These lenses allow the camera to gather more light, thus a better shot.
-
These lenses make it easier to get out-of-focus, soft backgrounds.
DSLR cameras have two options for sensor sizes.
1. APS-C option: This is a smaller type and the most suitable for beginners. These sensors are enough for an entry-level DSLR photographer, common in easy to use and affordable cameras.
2. 35mm or full-frame option: This is a larger option and mostly used by professional photographers. The sensors have more resolution and are costly. Further, the lenses are sold either for APS-C or full-frame sensors. Thus you have to update the lenses if you want to swift between the two options later.
The sensor design is another important element of a camera. Backlit sensors have both the circuitry and gear placed at its back; thus making it easier for the light to penetrate to the sensor. These sensors perform well in low lighting.
Additionally, anti-aliasing or optical low pass filter are being faced in the production of cameras. These filters have been useful in preventing distortion in patterns, but instead, manufacturers are using sensor technology to eliminate this distortion without the use of a filter.
Filters are placed between light and sensors; therefore, cameras that have no optical low pass filter tend to capture finer details and richer colors. That is why the latest Nikon’s DSLRs have no filters.
On the other hand, Canon models have two sets of cameras; one with a filter and the other without. The one with a filter, as stated above, prevents distortion or patterns or miore prevention, thus ideal for product or fashion photography.
5.Lenses
Sensors and lenses are important in a camera for everything have to go through the lens to get to the sensor.
Take, for example, the point-and-shoot camera and compare the zoom range between its different cameras. You will discover that some have wider ranges just like Nikon Coolpix P610 that can zoom from 24 to 1,440mm.
However, you will find another camera with superior features but a ridiculously lower zooms. Therefore, you shouldn’t focus so much on numbers.
There are two types of zoom, namely digital and optical. The optical zoom behaves the same way the actual lens does while the digital zoom crops an image and degrades its quality.
Cameras like Sony RX1 and Fujifilm X100T have permanent 35mm lenses, no zoom or changing lenses most photographers prefer these cameras while others think that acquiring such models is a stupid idea. Ultimately, it boils down to an individual's personal preference and shooting style.
On the other hand, DSLRs have a wide choice of lenses. Its manufacturers are offering a variety of third party brands and adapters to attach. Further, these cameras have kits that have lens and camera body. These lenses have lower quality but better results.
Additionally, there are big and expensive lenses that allow the penetration of a significant amount of light and still produce sharp, undistorted images, even in low-light conditions.
Mirrorless cameras, on the other hand, have a wide choice for casual photographers but limited options for their professional counterparts.
6.Shooting Speed
You need to consider how fast your camera can snap. Photographers working in the sports field and those interested in continuous shooting requires a camera with a good speed. Speed is essential when capturing the best expressions.
You can measure the overall speed of your camera by the number of shots it makes per second (fps). You have to move some gears when using a DSLR camera to take shots.
One of this is a mirror mechanism which is absent in Mirrorless cameras. You need to consider those big images for it takes longer to process digital images, particularly those with a higher megapixel count.
In view of this, most DSLR cameras have five images in a second (5fps) burst speed and 10 fps is an excellent speed for your DSLR camera. Therefore, the more shots your camera takes in a second, the better are your perfect moment. Burst speed is an excellent indicator of how your camera operates.
7.Megapixels
There are those individuals that buy cameras purely based on megapixels alone. This aspect is concerned with your camera's resolution and megapixel count, which is obtained by multiplying the number of pixels on one side with the number on the other side.
More so, a higher megapixel translates to higher resolution images thus the ability to print bigger images or edit the photo without ruining.
On the other hand, sensor size determines the quality of an image and not the megapixels. For that reason, a 16 megapixels DSLR is much superior to a 42-megapixel smartphone. Therefore, a DSLRs with an APS-C size is a suitable camera for beginners.
A professional photographer may opt for a camera with more megapixels due to its higher resolution. However, a high resolution doesn't guarantee better images, and instead, the high ISOs contributes to noise. On the other hand, technology has made it possible for high megapixels and less noise.
8.ISO
ISO measures the light sensitivity of your camera; thus, it's a significant influence on the brightness of the image. ISO 6400 is high and produces brighter shots than ISO 400 or low ISO. On the other hand, a high ISO creates a grainy image due to increased noise.
Therefore go for low ISO when shooting in a brightly-lit scene for this will reduce noise and produce bright images. On the other hand, you need to use a higher ISO when taking photos in a dimly-lit area for your camera sensor requires that high sensitivity.
Therefore low ISO of 200-800 is suitable for outdoor while a high one of 1600-3200 is ideal for lower light or indoor. These adjustments will produce higher quality images.
The exposure triangle is a combination of aperture, ISO and shutter speed. These elements deal with light where shutter speed and aperture regulates the quantity of light entering your camera. ISO, on the other hand, monitors the camera's light sensitivity.
Having a more in-depth insight into these three elements will guide when handling the DSLR for adjusting on these components will affect the image exposure. More so, you will be required to adjust the two elements if you change one of three.
9.The Exposure Triangle
The triangle has three components, namely the shutter speed, the aperture and the ISO. A photographer should learn how to control the three settings to be able to shoot great photos.
Shutter Speed: it’s measured in seconds and defines the length of time that the shutter is opened during shooting. A slow shutter speed leads to longer exposure time and both the aperture and shutter speed control the quantity of light reaching the sensor.
Aperture: It’s an opening in your camera’s lens just like the pupil of your eye. The element regulates the quantity of light entering the lens.
For instance, the aperture should be smaller when the scene is brightly lit to limit the amount of light reaching the sensor. More so, an aperture affects the depth of field or the amount of the image that sharply focused.
ISO: As discussed in details above, measure the light sensitivity. Increasing ISO makes the image sensor more sensitive to light.

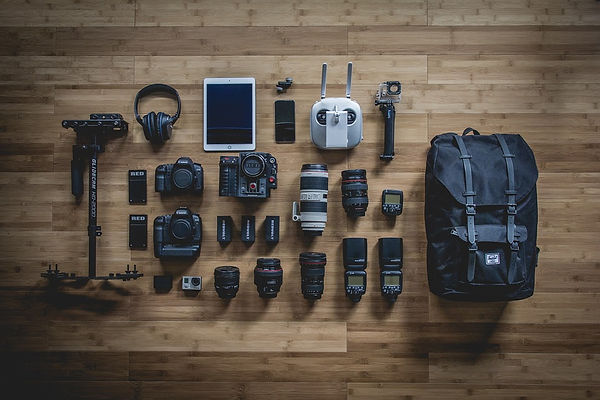
Photography Equipment
Camera Body: the camera body should handle the sort of images you want to take. Therefore ensure the camera that purchase should have all the essential features that you need to take shots. For instance, you should opt for point-and-shoot whenever you want to make changes on the exposure or create depth.
Tripod: It's an ideal investment for photographers that have shaky hands; thus, you need a reliable, light and sturdy tripod.
Lenses: There are different sizes and shapes of lenses. These accessories last longer than the camera body itself. Thus take your time when shopping for lens and ensure you have the right lens with all functions and focal angle needed.
External Hard Drive: It has been stated you need to store your photos properly to avoid getting erased. This is one of the external means of storing your work.
External Light: These additions help to remove shadows on the subject. This is evident in portrait photographers.
Memory Cards: purchase two memory cards and carry them in your in bank whenever you are going for a photoshoot. This will help you to avoid deleting your photos to create space for more.
Rechargeable batteries: These extra batteries will help you when you go out on a photoshoot. Thus these batteries are suitable for long trips.
Cleaning Supplies for the Camera and the Lens: you need to clean your lenses to avoid contaminating the quality of your photos. The cleaning should be done using proper cleaning materials.
Carrying gear or bag: You need a bag for carrying your gear whenever you are traveling or moving locations.

Types of Photography Genres
Wedding Photography: Weddings have supported photography even the decades for photos are ranked among the must-have for every wedding occasion. Wedding photographers are always on their feet, highly adaptable for they shoot on a sunny day and dimly lit indoors receptions.
Portrait Photography: Portraiture is a common career in photography for people who need photos in every stage of their life. A portrait photographer is needed in maternity and newborns, when the kid joins the school, when they graduate, during their wedding and as they age as well as a general family photo.
More so, corporate portraits are taken by employees to be used in publicity materials or on the company website.
Fashion Photography: The fashion industry is one of the most glamorous industries that has supported photography for many decades. Fashion photographers take photos on the runways to document the latest styles and trends thus used on the covers of fashion magazines.
They also work with designers and takes shots in different locations, such as the subway to tropical beaches.
Travel Photography: These photographers focus on different settings like capturing the landscapes, people and their lifestyles or natural world in addition to wildlife photography. Therefore travel photographer has a role of helping people to travel the world without leaving their home.
Wildlife Photography: The photographer captures animals in their natural habitats. These photographers use zoom lenses to take their shots to avoid disturbing the animals or endangering their lives.
The international wildlife photographers of the year awards is an event where wildlife photographers are identified and recognized for their work. Yongqing Bao from China was the 2019 wildlife photographer of the year.
Astrophotography: These are photographers who shoot celestial objects, and they require specialized skills such as location scouting, time-lapse photography knowledge, planning and patience.
Event Photography: These are fast-paced, dynamic occasions which require a blend of portraiture and photojournalistic documentary work. The event photographers may be invited for crazy and wild rock concerts or corporate events where the organizations use these photos as souvenirs or publicity purposes.
Advertising Photography: You will see photos on the street signs, billboards, smartphones, and magazine ads. Therefore, there is high photography in the advertisement industry which include subjects such as product photography, lifestyle photography, street photography and fashion photography.
Sports Photography: It's another area that requires photographers to capture sports personalities in action. Sports photographers use long lenses and quick cameras to capture winning shots and zoom in action. These shots end up in marketing and advertisement, publicity materials and news media.
Scientific Photography: there are many fields that really on photography for training materials, publications and record keeping. Many medical research and scientific companies hire speciality photographers to document discoveries and new findings. Further insurances companies work with photographers to inspect buildings and homes.
Photojournalism: Photographers are used to cover breaking news in community celebrations, political rallies, war zones, and natural disasters. Therefore magazines, newspapers and online publications use photojournalists to tell their stories and document events as they happen.

Portrait Photography for Beginners
Portrait photography is one of the best starting points for beginners for you can establish a great portfolio of professional shots which can lead to more business.
Use it as a starting point, and if you perfect the art of taking individual and family photos, then you can branch to weddings, fashion, travel, wildlife photography, among others.
The following are tips of mastering portrait photography. These suggestions will help you to capture not only stunning but emotive portraits that captivate and arouses viewers' attention and feelings.
-
Pay attention to your subject: Make your subjects comfortable for they are the most important aspect here. Therefore, take a few moments to connect, discuss their preferences and share your idea about this shoot.
-
Choose a suitable location: Always remember that a location can affect the final results of the portrait shoot. For instance, an outdoor shot will have enough lighting but can produce harsh shadows.
-
The background is as important as the subject: Choose an interesting background that makes your subject to stand out. You can also blur the background to bring out the subject. Therefore, adjust the aperture and shutter accordingly.
-
Pose: You have to get the right pose and portray the subject in a flattering way. Remember that most people are not comfortable posing.
-
Always capture the subject’s expressions and emotions. You may find it hard to get your subject to emote; however, avoid blank looks and fake smiles. A faint smile, genuine sparkle on their eye and a confident expression can do wonders on the portrait.
-
Use the right lens for the portrait. There is no exact lens for portrait photography, but you can try with several lenses until you get the best for the scenario. Always use a wide-angle lens in situations where the background or scenery is a vital part of the photo.

Best Photography Books for Beginners
There are several options of learning photography such tutorials on YouTube, Podcasts and courses both online and at tertiary institutions.
Another of learning photography is through books which have much higher quality than other free resources. Therefore, a beginner can learn photography through books and will direct you wherever your camera what you to go.
1.Advancing Your Photography
The book was authored by Marc Silber who interviewed several photographers and wished to pass the wisdom he gathered from them to you.
2.The Photographers Eye
Michael Freeman authored this book, and as a photographer, he teaches beginners how digital photography has made the world exciting. You will learn about composition and how this skill can help you to create professional photos.
3.Understanding Exposure
The book was authored by Ryan Peterson, who had significant experience in photography. Thus he can direct beginners on fundamentals of light as well as how to explore flash, filters and light.
4.Life Guide to Digital Photography
Joe McNally trains how to outthink your camera, take advantage of it and push it to the limits. Basically, McNally will help you to take photography to the next level.
5. The Photographers Guide to Posing
Lindsay Adler teaches posing, which is a vital skill that every photographer should have besides having the right camera settings, prefect light and excellent composition.
6.Camera: A History of Photography from Daguerreotype to Digital
Todd Gustavson authored this book, and he provides the history of machines that make these iconic images. Gustavson approaches the history from the wet plate cameras and pulls it through to the cameras employed by NASA on the moon.
7.Picture Perfect Practice
Roberto Valenzuela provides with information and tools on how you can become a skilled photographer that can work with any subject and any lighting condition as well as create great photographs with timeless impact.
8.Creative Black and White
Harold Davis is a reknown photographer that helps beginners on the importance of composition, lighting and contrast when color isn’t a guiding factor.
9.Langford’s Basic Photography: The Guide for Serious Photographers
Michael Langford will teach you how to form images, best camera and lens type, how to control what you are capturing as well as great lighting equipment.
10.Digital Photography Boxed Set
Scott Kelby has provided volume 1-3 on share secrets on photography and explains technical aspects of this skill, thus helping a beginner to learn how to shoot and improve their skills.
11.Fast Track Photographer
Dane Sanders is an acclaimed photographer that teaches you how to navigate around this highly competitive industry. Sanders helps you to focus on yourself because you are a powerful resource.
12.Complete Digital Photography
Ian Farrell guides on digital photography, starting from how to shoot, post-production and printing. You will acquire technical skills by the end of this book.

Photography Tips for Beginners
These are easy to understand tips that cover from camera technique composition to creativity.
1. Be satisfied with the camera you have for all the cameras available today are excellent, and their differences are minor. Your modern DSLRs is as great as the film photographers that captured iconic photos some decades ago, and they still look great.
Further what is important is your knowledge of camera settings and creative skills but not collecting camera equipment.
2. Get absorbed with what you are doing to be able to take engaging photos. Take time to learn the basics, don't ignore any part of your study, maintain your horizons level and get rid of any distractions by adjusting your composition to ensure that your shots have a sense of simplicity and balance.
You may realize that your images won't look professional in the first instance, but encouragement is that you continue experimenting until your photography are right.
3. You will realize that a camera has several settings and it will take time to learn all of them. Thus a beginner should first learn how to set a camera properly, and the most important settings to help you get the best shorts.
Therefore, avoid camera full auto because such a mode will be making all the decisions for you. Understand what is ISO, shutter speed, and aperture for these are the main parts of photography.
4. Light is an important part of photography; thus learn how to take shots with good light. However, sunsets don't make good light but balancing the intensity of light of the subject, and its background is an excellent skill.
Opposite of this will result in ruined photo as a result of silhouetted or completely dark foreground for all shots taken during sunset.
5. Always be careful when taking photos by never being in a hurry. The best way to do this is by taking your time when taking pictures and especially when you are a beginner.
The first thing you should do is to check your camera's settings. Most people will tell you to avoid review your photos at the scene, the ideal is bad, but it's good to review them during downtime to help you figure out what is the problem with them while you are still in the field rather when in the office.
6. Tripod is essential, and therefore it's important to know when to use them for they are helpful when eliminating the inadequate light problem. You can be able to capture details and shoot multi-minute exposures even when it's dark.
On the other hand, tripod improves the composition stability, thus allowing you to take sharper photos.
7. Flashes are great for they give you extra light. Flashes are both useful both indoor and outdoor. Use a gentle flash to fill in some unpleasant shadows falling on your subject.
8. Always remember to clean the lens of your camera to remove dust which can cause images to look blurry. You need to take out the lenses and clean them using a lens cleaning solution and microfiber cloth.
9. You should learn a few post-processing pricks for it can turn a generally good photo into something exceptional. On the other hand, it’s very easy to spoil the picture thus always make these edits non-permanent. Further, opt for the save as option to retain the original file. More so use software that store edits separately from the original image.
10. Always back up to avoid losing your important photos. Avoid storing your pictures on a single hard drive for it will break and you will lose the information.
In view of that, ensure that you have three copies of your work. Two of the copies should be stored in a removable storage medium and internal hard drive. The third copy should be stored externally or off-site. This what we call 3-2-1 rule.
